|
A
dismountable
plywood kiteboard |
| Home | Safety | Board | 5th line | Accessories | Navigation | Web | Contact | Bio | News |
After using my plywood board number 2 for one year and half , to avoid the luggage extra tax of the airline companies I built a dismountable board. A big thank you to Jean-Christophe who explained me the technique.
 |
New! A reader of this web site applied the same technique to a production board |
 |
As for the preceding boards , the outline is a portion of ellipse.
We just need to find the two axis, and the length of the board and the outline
is completely defined.
I made an Excel sheet which calculates the dimensions
of the board every 5cm.
The board is 148x39 cm. A little shorter and wider than board number 2.
| I traced the outline calculated with my Excel sheet, then cut out with
the jigsaw, approximately 1cm outside of the outline. I made this first
approximate cut for two reasons: - to use less resin - to get more rocker on the ends |
 |
 |
 |
I fixed the first board on his cleats. I coated resin the interior of
the first board, then coated resin the interior face of the other board.
It is the most delicate phase, one should go fast enough before the resin
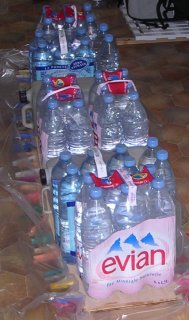
polymerizes. Then press the second board on the resin and place the ballast. I used sets of cans of water and mineral water packs. Let it harden at least 24h Apply the same technique to stick the reinforcement. As I prepared enough resin, I coated all the upper surface of the board. The rocker can still be adjusted a little with this phase, by the way I believe that I put a little bit too much rocker then.. |
I computed the dimension of the cleats so that the 3 cleats together have same resistance (same module of inertia) as the section of the board in the medium and indeed if one presses on the board, the inflection is regular, it does not have a folding in the medium there. Then on water the most significant efforts are under the feet, not at the middle of the board. I know where they break... I broke two of them.
I think this technique can apply to any kiteboard. Carving slots is easier with a 100% wood board, but one could do it with a composite board, it should be enough to cut the slot for the battens a little wider and thicker. Then to apply at the bottom a stratification of 2 layers of resin and glass fibres to protect the board core.
|
6) It is thus necessary to embed the nuts in the higher part
of the cleat . The nut must be well stuck, I used fast Araldite which
is another variety of epoxy.Once the nut are well embedded and stuck,
screw it completely , to measure and cut the screws. It is a meticulous
work because the end of the screw must have a perfect shpae to go inside
the nuts without problem. 7)Make a sealing with Rubson silicone between the 2 parts of the board and also between the cleats and the board. This prevents the sand from penetrating and damaging the resin. Put Scotch tape on one of the faces. Same thing between the fins and the board. |
  |
 |
I like the lookt varnished wood, therefore I did not paint the board. To underline the 100% wood design, I did poker-work, burning the wood. Finally a technique out of reach for composite shapers! The saucisseman logo is simply printed with an ink-jet printer and taken in the resin when coating the external.
For fixing the straps I used brass inserts. As they were longer than the thickness of the board, I had to saw them. I thought that inserts would be more practical in travel than a nut on a milled capscrew which crosses the board. In fact it is the opposite: The brass inserts have a fragile threading which is likely to damage with a sawn screw, whereas a stainless nut positions without problem. The next plywood board that I make, I return to the milled capscrew and nut technique
| I am very satisfied with the position of the fins on the board number
2, therefore I reused the same ones and stills only two of them. |
 |
Most of kiteboards have thin ends which are fragile and dangerous for the rider. The photographs come from the board number 2, but the technique is the same.

| Accueil | Météo | Sécurité | Planche | 5ème ligne | Accessoires | Navigation | Web | Contact | News |