|
a plywood
kiteboard |
| Home | Safety | Board | 5th line | Accessories | Navigation | Web | Contact | Bio | News |
After reading the site http://www.teethgrinder.co.uk/kiteBuilding/plyBoard.php I decided to build my own plywood board. I was an very nice board to ride until it broke strangely.
Looking to all 2002 model pictures convinced me to approximate the
outline to an ellipse.
I made an Excel spreadsheet which computes all coordinates
of the outline every 5cm, and that's the way I drew my outline.
Board size: 152x38 cm.

Curve in the length direction. I got it very simply with wedges of 3cm at the
ends of the board an enough weight in the middle.
To avoid to be too flat in the middle, I put it on top of two beams also
on wedges at the end.

I wanted real marine plywood of 5mm. It is more expensive
and harder to find than CTBX ou CTBY.
I was lucky to find the shop Bricol'Antibes in Antibes. And extremely lucky that
the guy accepted to cut two pieces of 40x153cm,5mm thick, in two
perpendicular directions, which is the best to assemble plywood. It costed me 60 €
but it is worth it, as it is stronger and lighter than the CTBX.
Two kind of resins are available, polyester and epoxy. Polyester is cheaper, but harder to dose (very small quantity of catalyser) and more difficult to work It is recommended to make two passes. Epoxy is more expensive, but easier to use ( a mix 30-70) and gives a stronger result since the first pass. One can choose the speed of hardering, and I recommend to take the longest one. I took 1h30 and that was just enough. After one hour my pot was completely polymerized, due to reaction heat. Better use a quite flat open recipient rather that a high confiture pot like I did.
I put a layer of fiber glass rowing between my two pieces of plywood. Epoxy plus fiber costed also 60€.
I drew the outline with the help of my Excel spreadsheet, and I cut about 1cm
away of the outline with a jig-saw. This first cut has two purposes:
- use less resin
- get more rocker at the ends
Then I cut a rectangle of fiber rowing with 2 to 3cm of margin
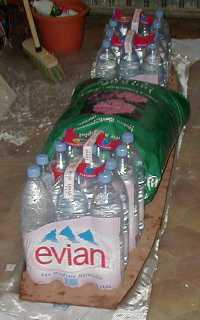 |
I placed the first ply on the wedges. I coated with resin the inner face of the first ply, then i applied the fiber, coating it until it became transparent and well applied on the wood. Then I coated with resin the inner face of the other ply. You must do both faces and the fiber in one shot, before the resin polymerizes. Then I pressed the second ply on the fiber and put the weight. I use a 50 litter bag of garden mould plus 4 pack of 6 mineral water bottles. Let it hardening at least 24h, Cut the fiber in excess, then the board with a jig-saw. I set the blade to a angle of 60 degrees. Then of course you sandpaper the edges. |
For fixing the footstraps I use stainless steel bolt with conic head. I screwed them by the bottom, no insert. Same thing for the leach attach.
|
 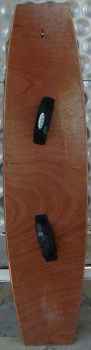 |
I was not fully convinced of the need of fins, therefore I did a compromise.
I put only two of them on the heel side.
Actually the board runs very well even on the side without fins.

Here you can see the rocker on the finished board:

This board goes better upwind than my Twin Tip F-ONE TT178. I had to adapt to the footstraps , a bit closer, but now it is OK.
 |
At the beginning the leach was too far from the end, making the board sink. I attached it closer to the end and now it no longer sinks |
A BIC board of the same size is 3Kg and I do not know if it includes the straps.
For 120€, it's a great board and the plywood look is classy.
 |
Around 15 knots of wind, the Mach 1 18m2, a small wave makes me loose my balance, I fall to the front, keeping the feet in the straps, the head in the water, I pilot the wing blindly to avoid make it fall. When I opened up the yes, the wing is at the zenith , but behind me the board is in two parts, linked by the footstrap. This is strange. Could it be the pressure of the water on the top of the board while I was pulled by the wind, keeping the feet in the footstraps? I was expecting thi sboard to break after a bad jump reception, not in a simple forward fall. |
The shape and the flex were very good for me, The board was going upwind very
well. the look was splendid, but the materials composition needs to be improved...
Glass fiber in the middle didn't really improve robustness.
Next time I will make a thinner kernel in plywood to save weight an I will put
glass fiber in the top and the bottom.
It will be more complicated to get a glassy surface, but I've been told that
one can put a plastic film on the resin to get a glassy surface.
This site was read
time, including this page
time
| Home | Safety | Board | 5th line | Accessories | Navigation | Web | Contact | Bio | News |
